Sunday 29 August 2010
Monday 23 August 2010
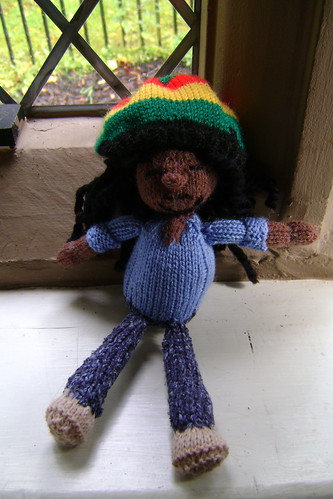
Hugging dolls- free (untested) pattern!
Hugging dolls
I made these for two of my lovely friends who had their civil partnership ceremony at the weekend.

Finished size approx 5 inches from bum to head
You will need:
Small amounts of DK yarn (less than 50g each colour) of flesh colour, trouser and sweater colour, smaller amounts for shoes, hair anf facial features
3mm DPNs
crochet hook for attaching hair
Darning needle
2 press studs, needle and thread to attach them.
Body
Cast on 6 sts in trouser colour and divide across 3 DPNs. Join, taking care not to twist, and place a stitch marker at the beginning of the round.
Row 1: inc 1 in every st (12 sts)
Row 2: K
Row 3: Inc 1 in every st (24 sts)
Row 4: K
Row 5: (inc 1, K1) to end (36 sts)
K 3 rounds
Row 9: (inc 1. K2) to end (48 sts)
K 3 rounds
Switch to sweater colour and (K1, P1) to end.
Cont in rib for 3 rows
Start cable pattern:
Row 1 (K4, P4) to end
Repeat 3 times
Row 4 (C2F, P4) to end
Row 5&6 (k4,P4) to end.
Repeat these 6 rows twice
(K4, P2tog, P2) to end (40 sts)
(K4, P3)to end
(K4, P2tog, P1) to end (32 sts)
(K4, P2) to end
now is probably a good time to get some stuffing in…
(K2tog, K2tog, P2tog) to end (16sts)
K
(k2tog) to end (8sts)
Draw up tightly and fasten off
Head
Cast on 6 sts in flesh colour and divide across 3 DPNs. Join, taking care not to twist, and place a stitch marker at the beginning of the round.
Row 1: inc 1 in every st (12 sts)
Row 2: K
Row 3: Inc 1 in every st (24 sts)
Row 4: K
Row 5: (inc 1, K1) to end (36 sts)
K 7 rounds for a very round head, 9 for a longer one
(K2tog, K1) to end (24 sts)
K
K2 tog to end (12 sts)
K
K2tog to end (6 sts)
Draw up tightly and fasten off.
Arms
Pick up 9 sts on 3 DPNs at shoulder- just above the last twist of cable for my version.
K 35 rounds, stuffing lightly as you go if you want more rigid arms- I left mine unstuffed.
Next 4 rows K1 P1 rib.
Switch to flesh colour and K 6 rounds, then draw up and fasten off.
Legs
Pick up 9 sts as for arms, at the bottom of the sweater.
K 30 (ish) rounds, or until legs are as long as you want them. Stuff as you go for more rigid legs.
Shoes
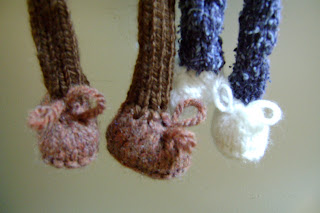
Using two needles, cast on 11 sts
Inc 1 in every st (22)
K 3rows for sole of shoe
Starting with a P row, ss 5 rows
K5, (K3tog) 4 times (14 sts)
P4, P3tog twice, P4 (10sts)
Cast off.
Fold in half and stitch together along cast-on edge then continue stitching up row ends, leaving top open.
Stuff firmly and attach to bottom of legs.
Attach head to top of body, embroider eyes and mouth. Hair was attached in individual strands using a crochet hook.
Sew press studs to hands so dolls can hug, hold hands, or swing from the light fittings!

Tuesday 17 August 2010
Zombie pattern notes


OK, had a few requests so I have very hastily put this together. I accept no responsibility for the quality of the finished product!
Zombie pattern notes
Not the most complete instructions you’ll ever see, but who’s ever seen identical zombies?
Materials
Small amounts of DK in suitable colours for flesh, blood, bone, and whatever clothes and hair you want. Tiny amount of grey or pink for brains.
Size 2.75mm needles
Pipe cleaner?chenille straw/wire for stiffening bone ends
Darning needle
Dark colouring pencil for shading in under eyes and making dirt smudges
Crochet hook for hair
Gash
Insert these at random.
Use blood colour for 1 st of the row you want the gash to start.
Next row, when you get to the gash, inc 1 (2 red sts)
Repeat x2 (8 sts)
Continue for about 4 rows with no increases.
Next row, when you get to the gash, K2 4 times
Repeat until 1 red st left
Next row, continue in main colour
Whole leg
Cast on 6 sts in flesh tone
Purl 1 row
Inc into every st (12 sts)
P 1 row
(inc 1, K1) to end (18 sts)
cont in SS for 45 rows, ending with a P row. Part way up the leg (depending on how long you want the trouser leg) introduce the trouser colour, alternating with leg colour to make a ragged shape. Add a gash if you feel like it. Keep these sts on needle.
Leg with bone sticking out
Cast on 6 sts in white
Starting with a K row, ss 4 rows.
Switch to Blood and inc 1 in every st (12 sts)
P 1 row
(Inc 1, K1) to end (18 sts)
Switch to flesh and cont in SS for a total of 33 rows, changing to trouser colour as for whole leg, adding a gash if you feel like it, and finishing on a P row. If I’ve worked this out right, both legs should be on the same needle ready to join….
Body
K across all 36 sts to join legs.
P 1 row
(K2, inc 1) to end (48 sts) (or just K for a skinnier zombie)
Cont in SS for about 35 rows, joining in shirt colour as for trouser colour on legs, adding a gash or two. For the gash across the ribs I just knitted a random shape bordered by flesh colour and with alternating stripes of Blood and Bone colours (ooh I enjoyed typing that). I could make a chart if anyone is really interested.
To decrease for shoulders, K9, K3tog 3 times, K20, K3tog 3 times, K9 (36 sts)
P 1 row
K6, K3tog twice, K12, K3tog twice, K6 (26 sts)
P1 row
K2tog to end (13 sts)
P 1 row
K1, K2tog to end (7 sts)
Draw up tightly and secure
Head
Cast on 6 sts
Inc 1 in every st (12)
P1 row
Inc 1 in every st (24)
SS 3 rows
(K1, inc 1) to end (36)
SS 9 rows
(K1, K2tog) to end (24)
SS 3 rows
K2tog to end (12)
P1 row
K2tog to end (6)
Draw up tightly and secure.
Whole arm
Cast on 4 sts in flesh tone
Purl 1 row
Inc into every st (8 sts)
P 1 row
(inc 1) to end (16 sts)
SS 5 rows
For wrist, K1, (K2tog, K1) to end
P 1 row
K1, (inc 1, K1) to end (16)
cont in SS for 27 or so rows, ending with a P row. Part way up the arm (depending on how long you want the sleeve) introduce the trouser colour, alternating with flesh colour to make a ragged shape. Add a gash if you feel like it.
K2tog to end (8)
P2 tog to end (4)
Draw up tightly and secure
Arm with bone sticking out
Cast on 4 sts in white
Starting with a K row, ss 6 rows.
Switch to Blood and inc 1 in every st (8 sts)
P 1 row
(Inc 1, K1) to end (16 sts)
Switch to flesh and cont in SS for a total of about 19 rows, finishing as for whole arm.
Shoe
Cast on 18 sts
Inc 1 in every st (36 sts)
P1 row
K 3 rows to form a ridge
Starting with a purl row, SS 3 rows
K10, K3tog 4 times, K10 (24 sts)
K1, P1 rib for next 4-5 rows for sock
Cast off
Making up
Body
Starting at foot end , mattress stitch edges of legs together up to join, stuffing as you go and inserting a length of pipe cleaner in the bone. Insert less stuffing where gashes are and push gashes in with your finger to gauge how much stuffing is needed.
Continue to mattress stitch up body, again stuffing as you go.
Arms
Stuff as for legs and attach to shoulders
Head
Starting at whichever end you feel like, mattress stitch edges of head together and stuff firmly. Attach to top of body
Boot
Fold in half and stitch together round edge, leaving cast-off edge open. Stuff shoe and pull onto whole leg end. Stitch in place.
Using Bone colour, make a long stitch in each gash to look like a bone, and to hold gash in place. On head, stitch on facial features before choosing where to put a patch of brain. Embroider a rough circle in grey, and edge with white then red. Liberally embroider blood spatters everywhere then add hair around the brain section (send me a message if you want any tips on doll hair).
Monday 16 August 2010


Monday 9 August 2010
some recent projects
Ok, once again I've been very very busy, on a deadline to finish about 3 different projects!! So here are a few photos. OK the top one isn't knitted, it's a quilt.


Subscribe to:
Posts (Atom)